
This tutorial covers how to use most of the basic functions of the Duet Driver app on your mobile device. Let’s begin!
Audio unavailable. Please try again later.
Home Screen: Trip Dashboard
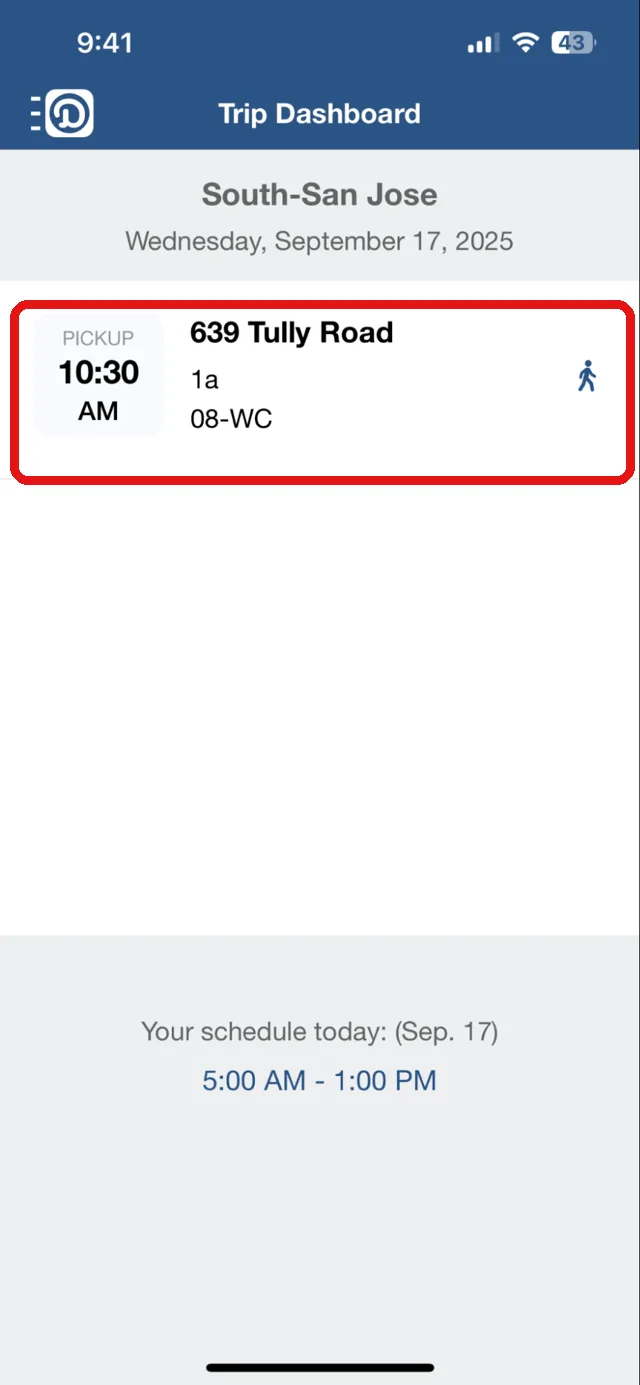
Your home screen is also called the “Trip Dashboard”. Here you will see all of your assigned trips for today.
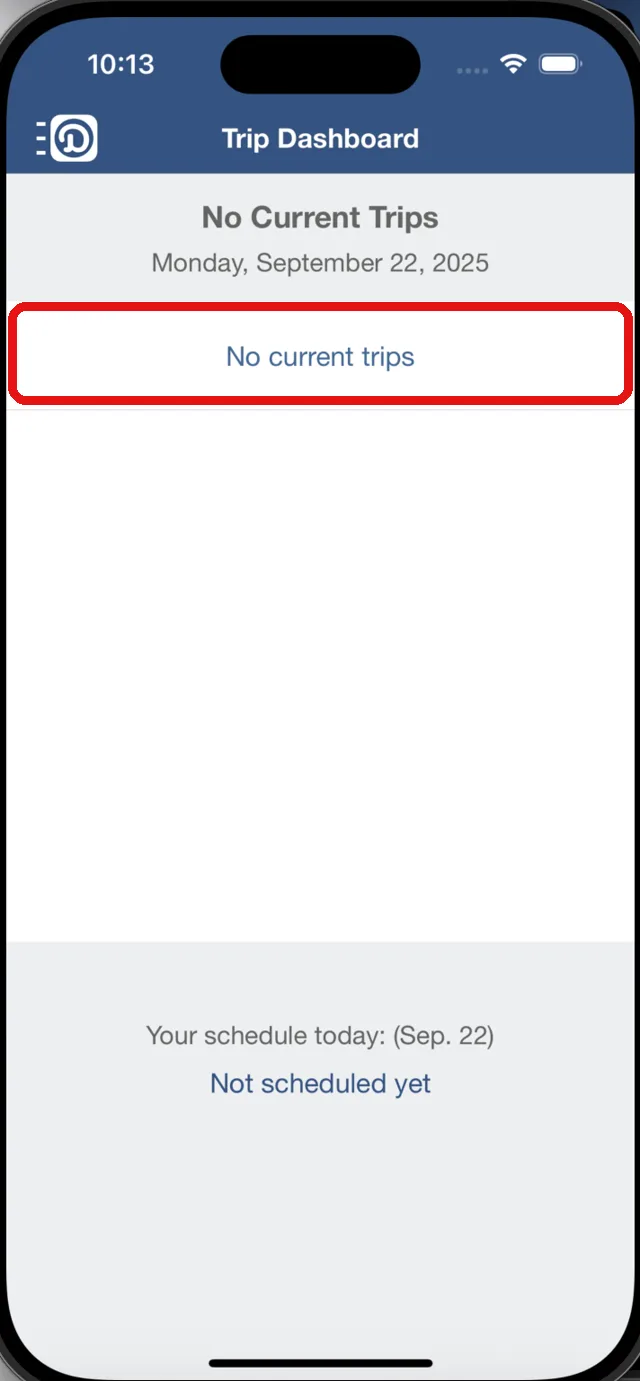
After you complete all your trips for the day, you should have a blank screen. Make sure that your home screen is blank before you take off for the day.
If you can’t complete any of the trips assigned to you, you will need to ask your dispatchers to remove those trips from your app. Only dispatchers can add trips to or remove trips from your account.
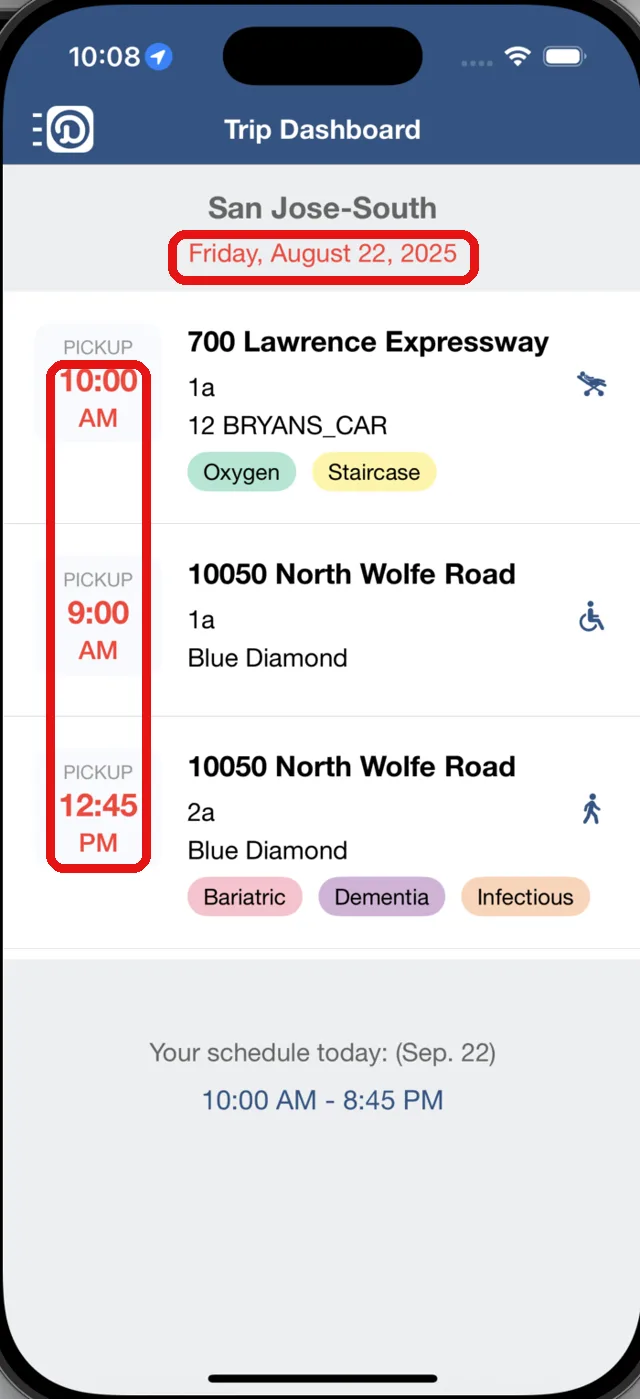
Note: if you have trips from the previous day or earlier that were not cleared in your app, they will stay on your home screen. Their pickup time will be shown in red, and the old date will be displayed at the top of the trips.
You will need to close these trips individually by tagging them “Complete pickup” and “Complete dropoff”.
Or you can ask your dispatchers to help you clear those trips.
Conduct the Trip
1. Tap the first trip to go to the next screen, My Trip.
Note: always start with the first trip on the list unless your dispatcher tells you otherwise.
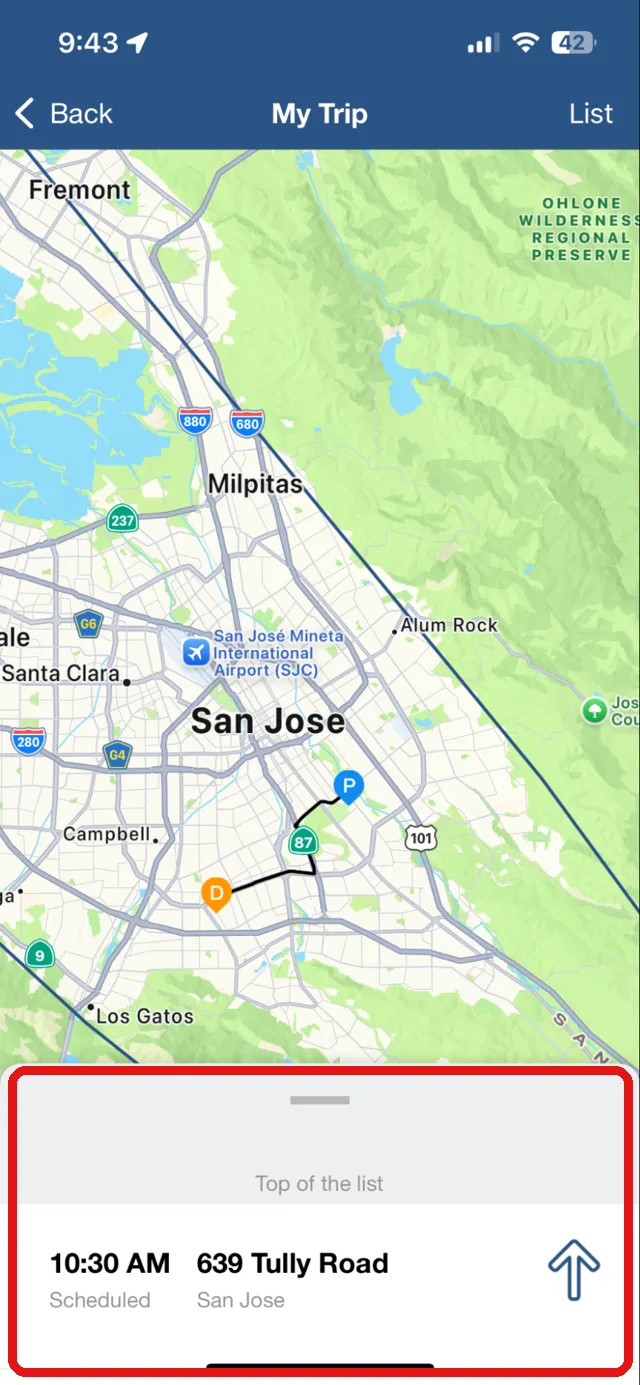
2. On the My Trip screen, you will see a tab at the bottom of the screen. Put your finger on the grey area to slide the tab up, or tap the grey area to let the tab pop up by itself.
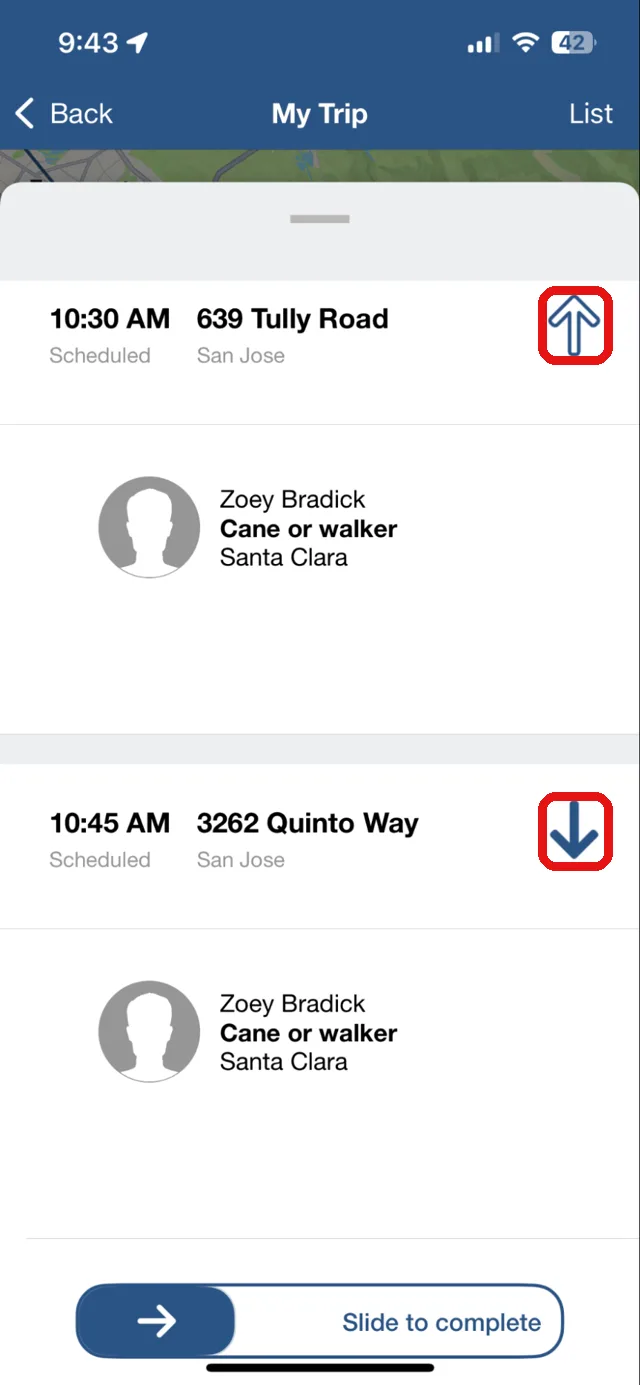
3. Once the tab pops up, two sections appear: Pick Up and Drop Off. These two sections are indicated by the arrows next to the addresses: arrows pointing up are for Pick Up, and arrows pointing down are for Drop Off.
The scheduled pickup (or dropoff) time and address are displayed at the top of each section.
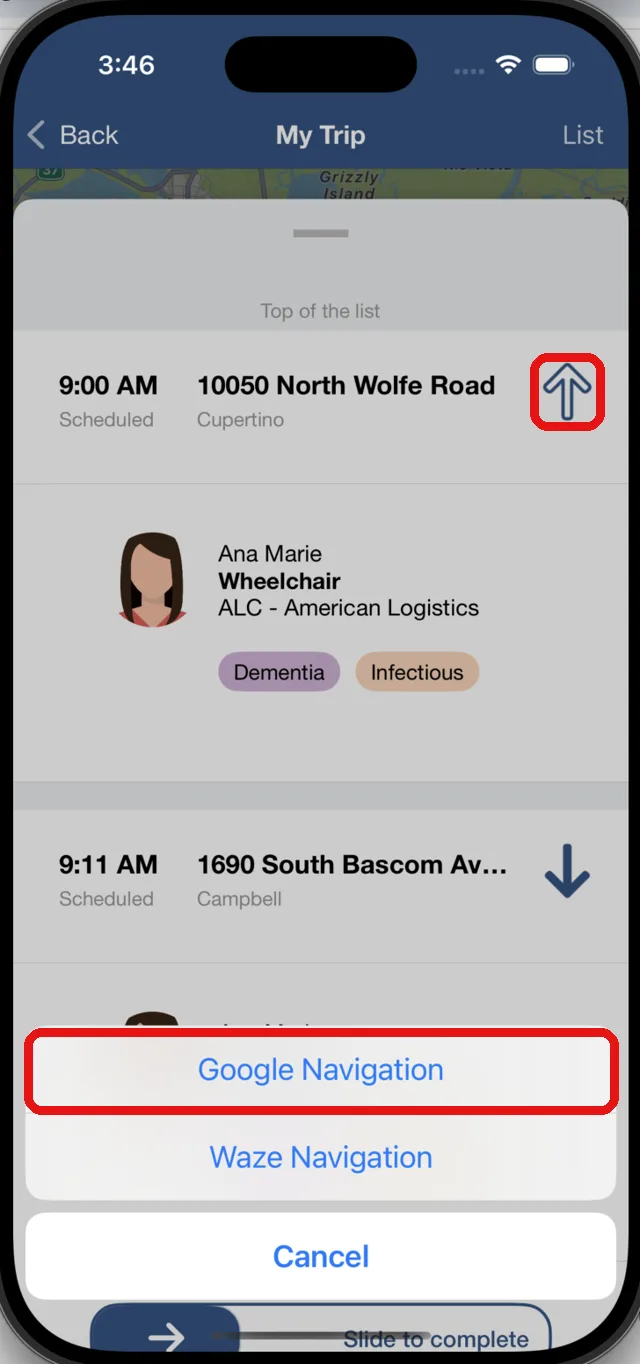
4. Tapping the arrow will take you to Google Maps for navigation.
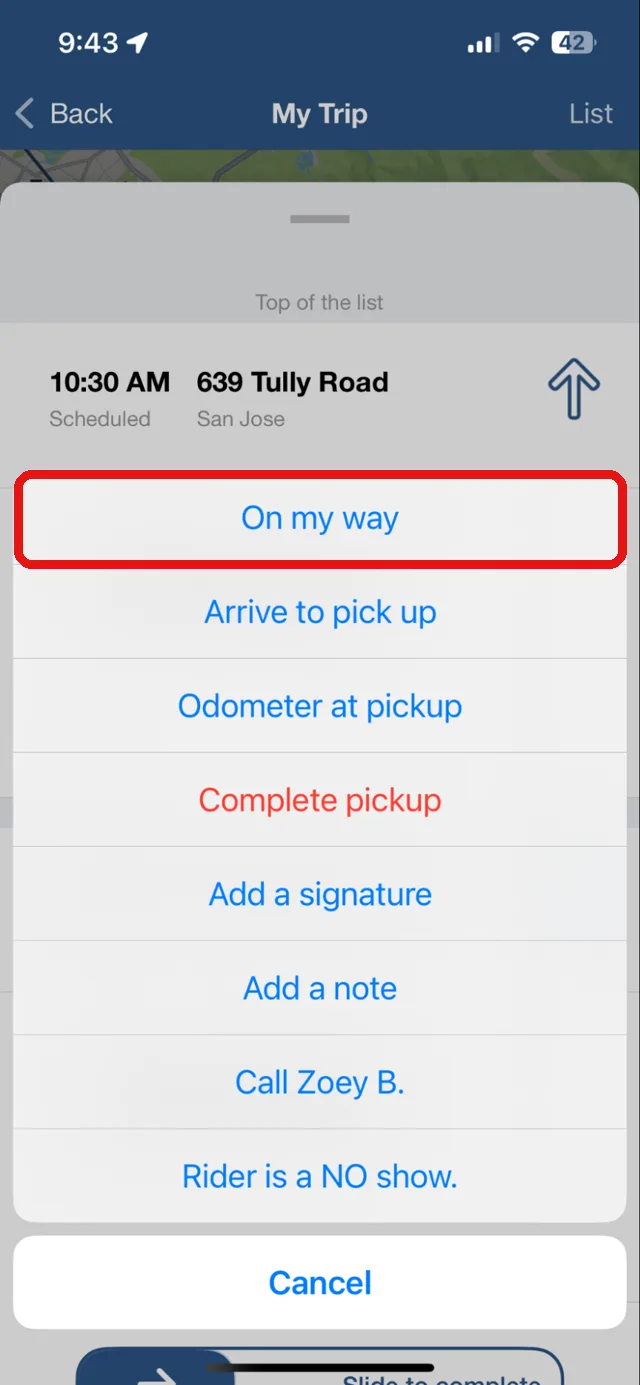
5. When you’re ready to go to the pickup location, tap the patient’s name or photo in the pickup section (with the arrow pointing up), and a list of actions will appear.
Tap “On my way” to indicate that you’re ready to drive to the pickup location.
When you tap the actions on the list, you’re sharing your progress with your dispatchers, and your actions are very important for your operation and trip billing. Please tap (tag the trip) to indicate your progress accurately.
If you forget to take an action, you can still tap it later, but please let your dispatcher know the correct time for that action so they can adjust it on their end.
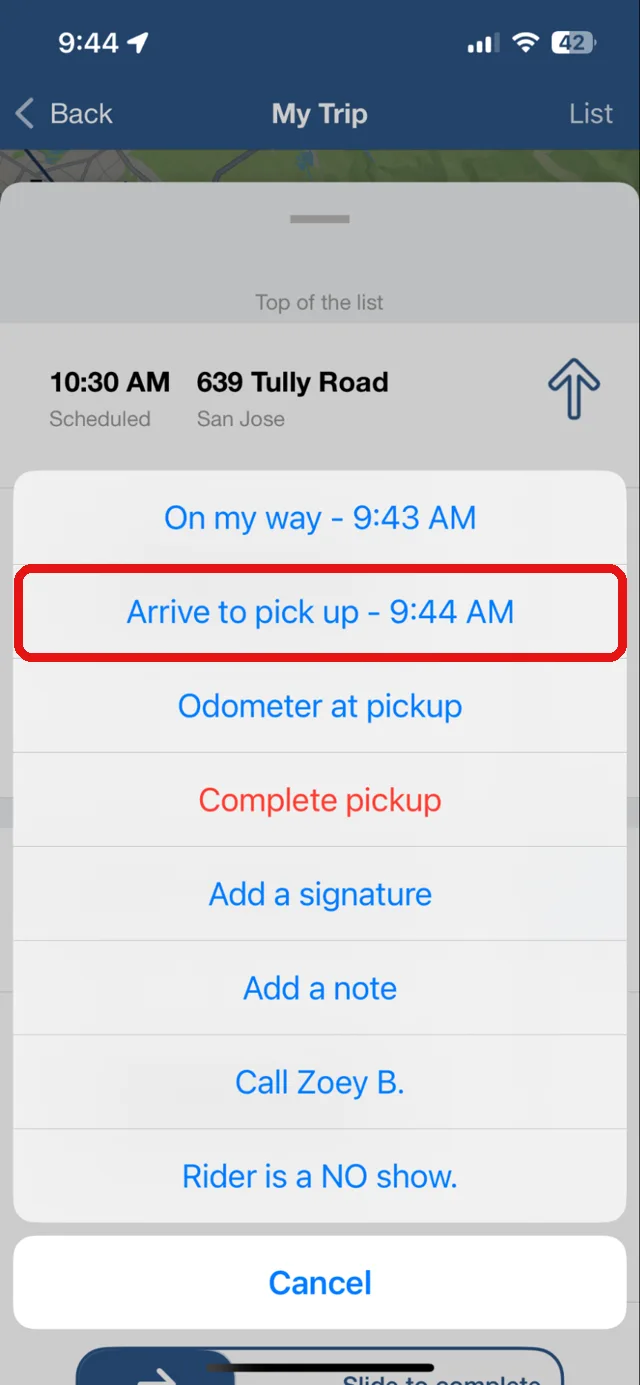
6. Once you have arrived at the patient’s location and parked the vehicle, go back to the app > My Trip screen > the list of actions, and tap “Arrive to pick up”.
Then find the patient and help them get into the van.
Note: if dispatchers turn on the automatic Arrival to pickup time collection setting, you will see the Arrival to pickup time is saved automatically when you're within half mile of the pickup location. You can leave it as is.
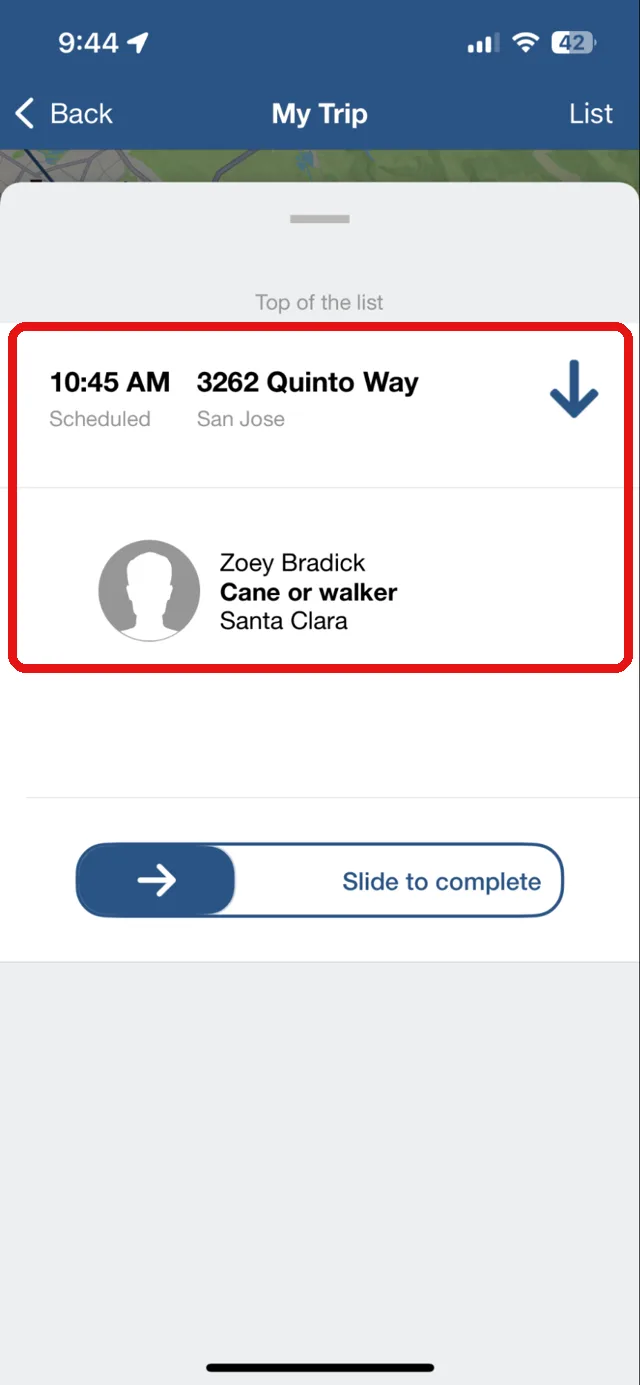
When the patient is secured inside the vehicle and you are ready to leave for the dropoff, tap “Complete pickup”. At this point, the “Pick up” section will disappear, and only the “Drop off” section will remain. You can then proceed to the dropoff location.
If you need to collect the patient’s signature, it’s best to ask the patient to sign now. Just tap “Add a signature” before you tap “Complete pickup”.
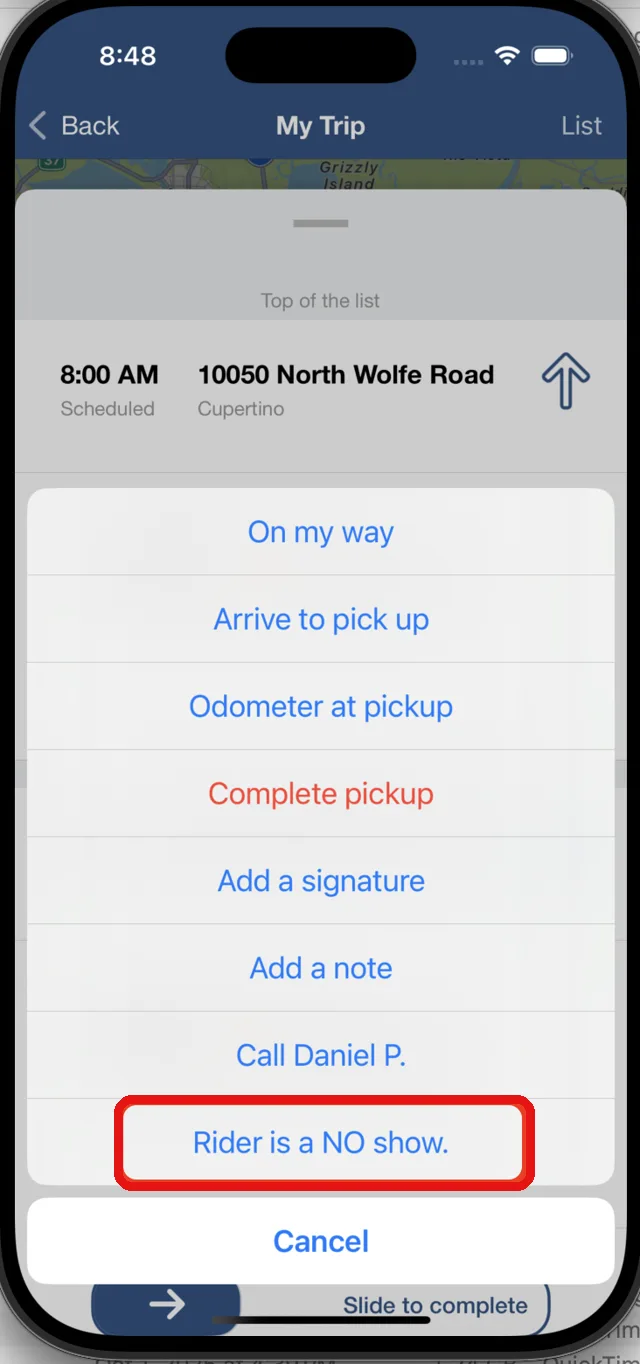
If you’re already at the pickup location but the patient cancels the trip at the last minute or can’t be found, you can mark the trip as a no-show. Just tap “Rider is a NO show” on the list of actions.
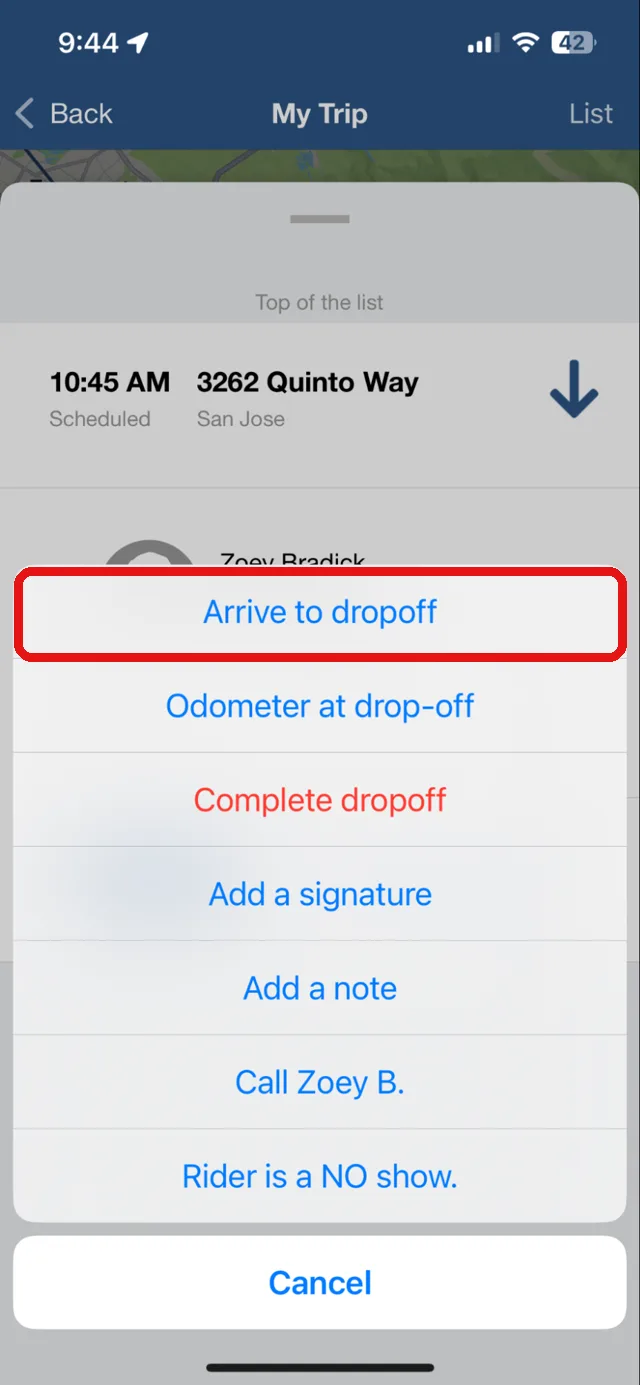
7. Once you arrive at the “Drop off” destination and park the vehicle, go back to the app > My Trip screen > the list of actions, and tap “Arrive to Drop Off”. You can then proceed with dropping off the patient.
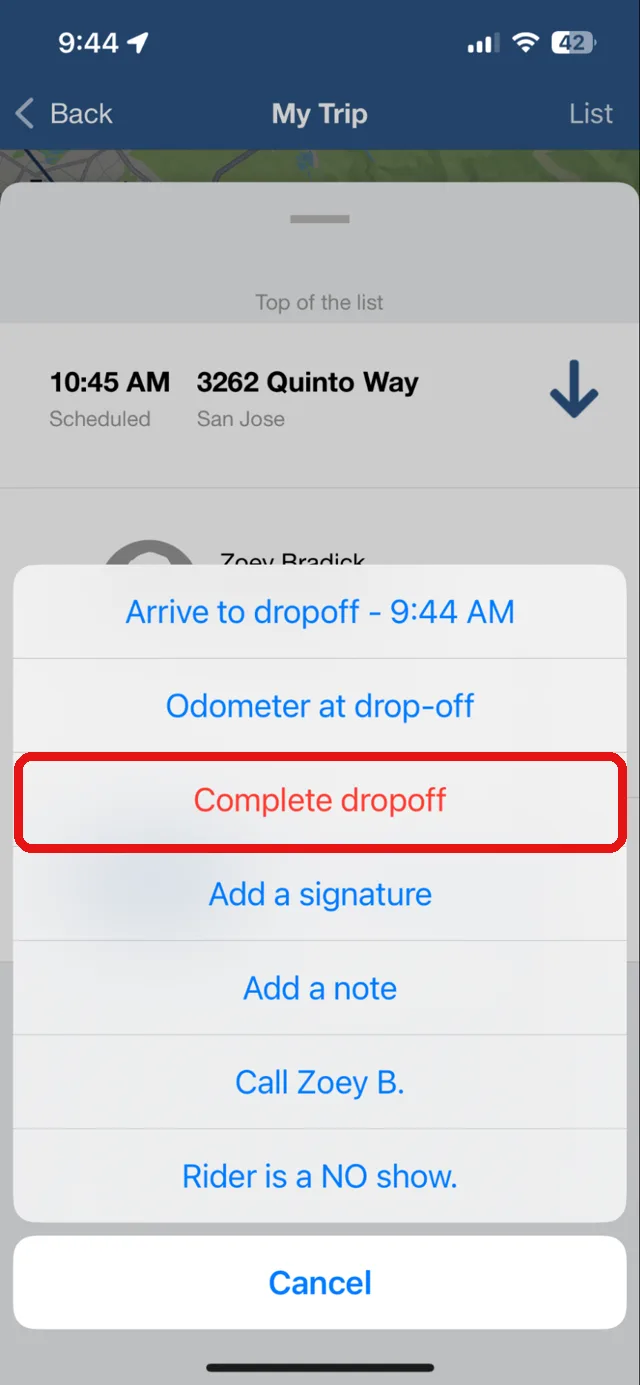
8. After you safely drop off the patient at their destination and before you leave the patient, go back to the app > My Trip screen > the list of actions, and tap “Complete dropoff”.
If you’re required to collect the patient’s signature and you haven’t done so at pickup, you will be asked for the patient’s signature after tapping “Complete dropoff”.
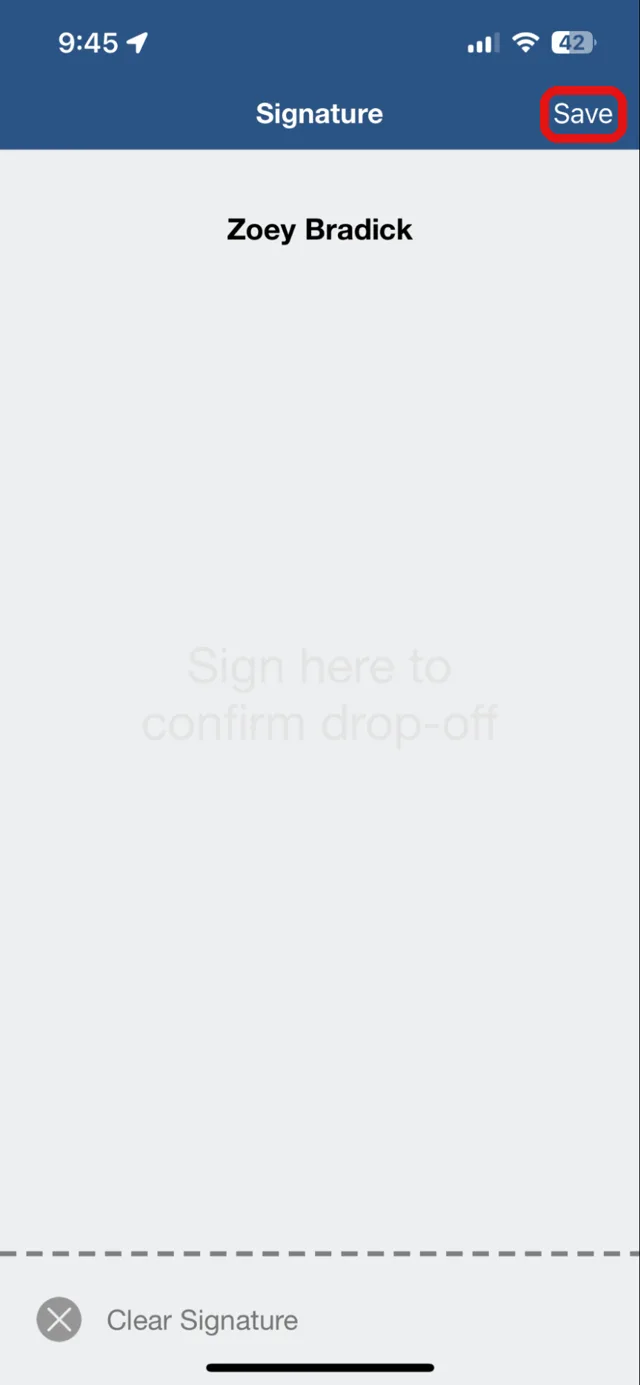
If you can’t get the signature anymore, you can still tap “Save” and select “Missing signature” to clear the trip.
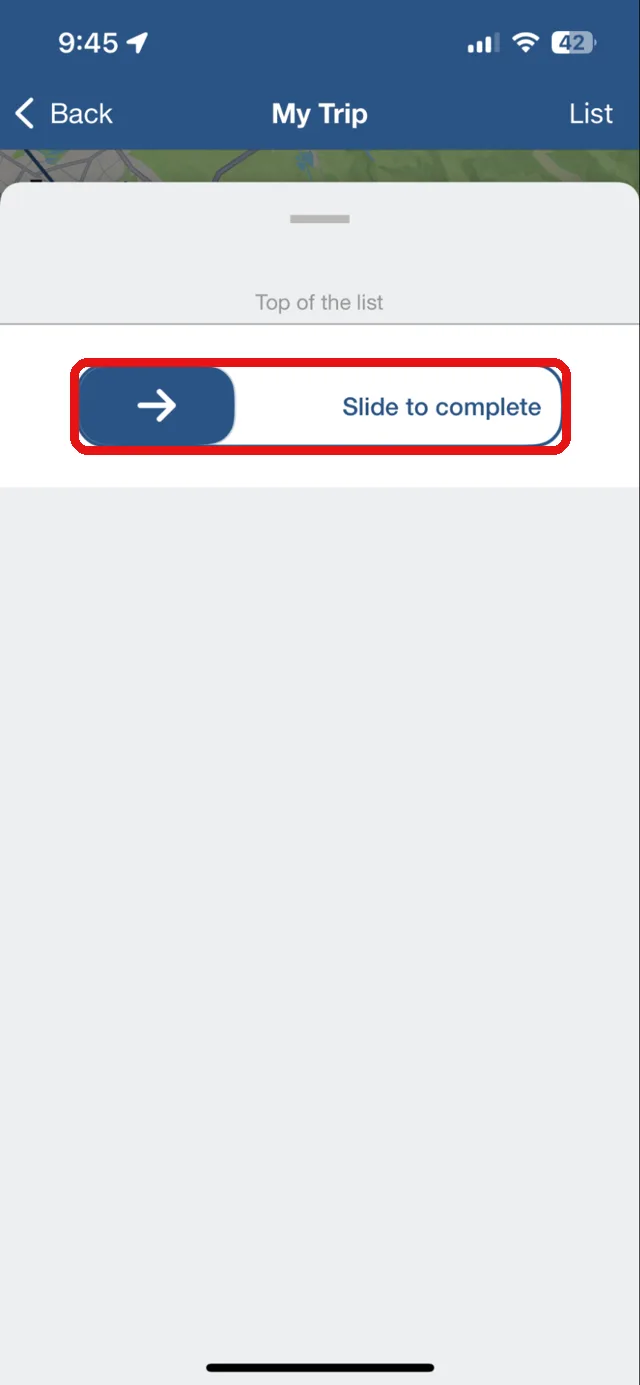
9. With the signature collected and the patient dropped off, you are now clear to close the trip. Slide the “Slide to complete” button. After you slide it, the trip will be removed from your home screen.
Please complete and clear all the trips for the day before you finish the day.
If your schedule changes during the day (for example, a trip is added to or removed from your schedule), you will receive a text message about the change and hear an alert sound from the Duet app.
Logging in or opening the app will stop the sound.
Este tutorial cubrirá cómo realizar la mayoría de las funciones básicas de la aplicación de conductor de Duet en tu dispositivo móvil. ¡Comencemos!
Audio no disponible. Inténtalo de nuevo más tarde.
Pantalla de inicio: Trip Dashboard
Tu pantalla de inicio también se llama “Trip Dashboard”. Aquí verás todos los viajes asignados para hoy.
Después de completar todos tus viajes del día, deberías tener una pantalla en blanco. Asegúrate de que tu pantalla de inicio esté en blanco antes de finalizar tu jornada.
Si no puedes completar alguno de los viajes asignados, deberás pedir a tus despachadores que los eliminen de tu aplicación. Solo los despachadores pueden agregar o eliminar viajes de tu cuenta.
Nota: si tienes viajes del día anterior o del pasado que no fueron eliminados en tu aplicación, estos viajes seguirán apareciendo en tu pantalla de inicio. Su hora de recogida se mostrará en color rojo y la fecha anterior aparecerá en la parte superior de los viajes.
Tendrás que cerrar estos viajes individualmente marcándolos como “Complete pickup” y “Complete dropoff”. O puedes pedir a tus despachadores que te ayuden a eliminar esos viajes.
Realizar el viaje
1. Toca el primer viaje para ir a la siguiente pantalla, My Trip.
Nota: siempre comienza con el primer viaje de la lista a menos que tu despachador te indique lo contrario.
2. En la pantalla My Trip, verás una pestaña en la parte inferior. Pon tu dedo sobre el área gris para deslizar la pestaña hacia arriba, o toca el área gris para que la pestaña se despliegue automáticamente.
3. Una vez que la pestaña se despliega, aparecen dos secciones: Pick Up y Drop Off. Estas dos secciones están indicadas por las flechas junto a las direcciones: las flechas hacia arriba son para Pick Up y las flechas hacia abajo son para Drop Off.
La hora y dirección programadas para la recogida (o entrega) se muestran en la parte superior de cada sección.
4. Tocar la flecha te llevará a Google Maps para la navegación.
5. Cuando estés listo para ir al lugar de recogida, en la sección de recogida (con la flecha hacia arriba), toca el nombre del paciente o la foto, y aparecerá una lista de acciones.
Toca “On my way” para indicar que estás listo para ir al lugar de recogida.
Cuando tocas una acción en la lista, estás compartiendo tu progreso con tus despachadores, y tu acción es muy importante para la operación y la facturación del viaje. Por favor, toca (etiqueta el viaje) o indica tu progreso con precisión.
Si olvidas realizar una acción, aún puedes tocarla más tarde, pero por favor infórmale a tu despachador la hora correcta de esa acción para que pueda ajustarla desde su lado.
6. Una vez que hayas llegado a la ubicación del paciente y estacionado el vehículo, regresa a la app > pantalla My Trip > la lista de acciones, y toca “Arrive to pick up”.
Luego deberás encontrar al paciente y ayudarlo a subir a la camioneta.
Nota: si los despachadores activan la configuración de registro automático de la hora de llegada a la recogida (Arrival to pickup), verás que esa hora se guarda automáticamente cuando estés a menos de media milla del lugar de recogida. Puedes dejarla tal como está.
Cuando el paciente esté asegurado dentro del vehículo y estés listo para salir hacia el lugar de entrega, toca “Complete pickup”. En ese momento, la sección “Pick up” desaparecerá y solo quedará la sección “Drop off”. Luego podrás continuar hacia el lugar de entrega.
Si necesitas recoger la firma del paciente, se recomienda pedirle que firme ahora. Simplemente toca “Add a signature” antes de tocar “Complete pickup”.
Si ya estás en el lugar de recogida, pero el paciente cancela el viaje en el último momento o no se le puede encontrar, puedes marcar el viaje como “no show”. Simplemente toca “Rider is a NO show” en la lista de acciones.
7. Una vez que llegues al destino de entrega y estaciones el vehículo, regresa a la app > pantalla My Trip > la lista de acciones, y toca “Arrive to Drop Off”. Luego puedes proceder con la entrega del paciente.
8. Después de dejar al paciente de manera segura en su destino y antes de retirarte del lugar, regresa a la app > pantalla My Trip > la lista de acciones, y toca “Complete dropoff”.
Si se requiere recoger la firma del paciente y no lo hiciste durante la recogida, se te pedirá que la obtengas después de tocar “Complete dropoff”.
Si ya no puedes obtener la firma, aún puedes tocar “Save” y seleccionar “Missing signature” para cerrar el viaje.
9. Con la firma recogida y el paciente entregado, ahora puedes cerrar el viaje. Desliza el botón “Slide to complete”. Después de deslizarlo, el viaje se eliminará de tu pantalla de inicio.
Por favor, completa y cierra todos los viajes del día antes de terminar tu jornada.
Si tu horario cambia durante el día (por ejemplo, si se agrega o se elimina un viaje de tu horario), recibirás un mensaje de texto sobre el cambio y también escucharás un sonido de alerta de la aplicación de Duet.
Iniciar sesión o abrir la aplicación detendrá el sonido.