Map Your Group
When planning transportation for a group or a company, it's always helpful to know where all the members are located relative to the campus or event site. Now we have a mapping tool to help you accomplish this. Besides showing the locations on the map, the tool lets you label the transportation mode of each member and then color codes the members' map pins according to the corresponding mode of transportation.
Pleaes follow the steps below to prepare your data for mapping.
STEP 1: Your member data set needs to have the information similar to the table in the picture below, preferrably in a Microsoft Excel file.
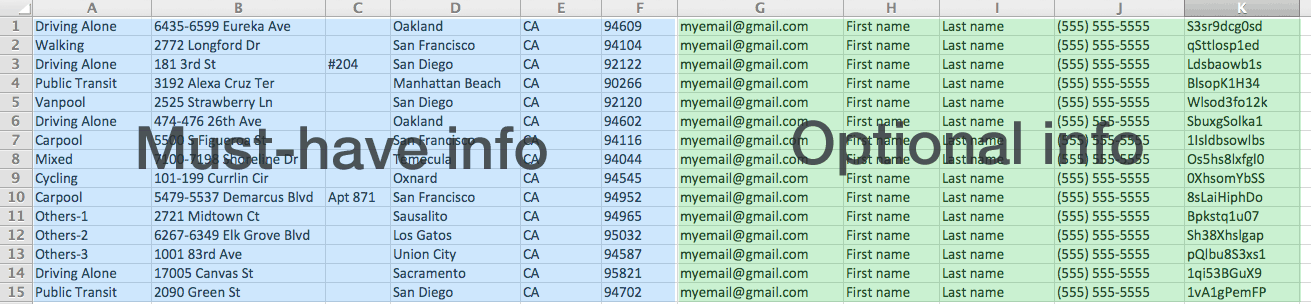
STEP 2: Organize the information according to the layout of the table: Col A - mode of transportation, Col B - street # and name, Col C - aportment # (if there isn't one, leave it blank), Col D - city name, Col E - state in two-letter code, Col F - zip code, Col G - email, Col H - first name, Col I - last name, Col J - member ID. Col A, B, D, E & F are must-have information for mapping. Col C, G, H, I, J are optional information for mapping and just leave the column blank if you don't have the information.
Note: use these transportation labels verbatim in both spelling and case - Driving Alone, Carpool, Vanpool, Cycling, Public Transit, Walking, Mixed, Others-1, Others-2, Others-3.
STEP 3: Make sure that you remove any column label on the top in the file, and start with member info in the very first row. Save the file using "Save as", and choose to save it in "Windows Comma Separated (.csv)" format. Note: it's very important to save the file in the correct format as any other csv format will not be compatible.
STEP 4: Once the file is ready, go to the the mapping site.
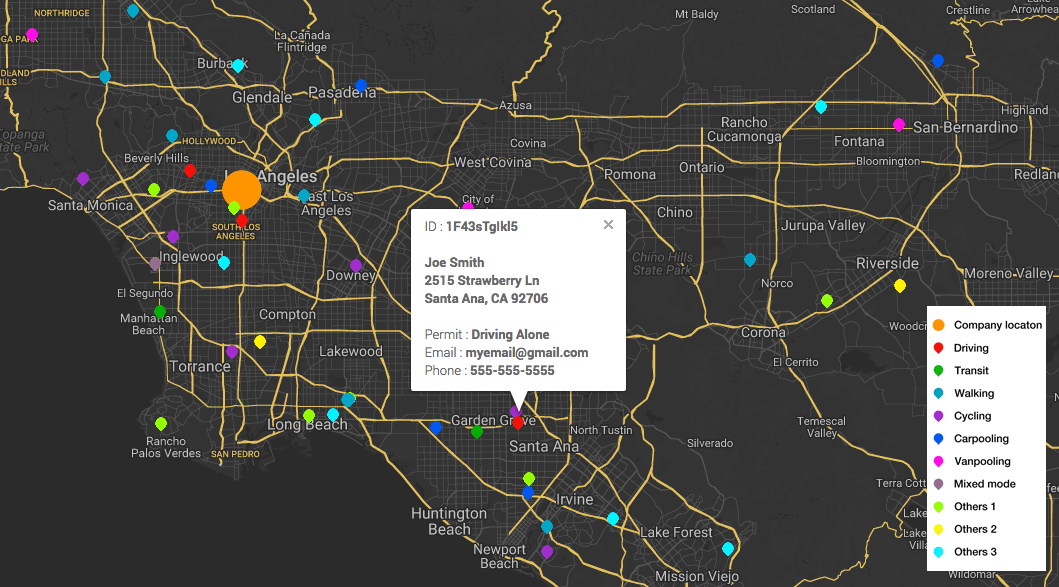
STEP 5: In the mapping site, click on "Choose File", select the previously prepared file and click on "Upload". After a few seconds, the locations are then displayed on the map. You may need to zoom in to see the details. You can switch between day view and night view to better visualize the map. If you click on individual pins, a callout will show up with the corresponding member's information.
STEP 6: Enter your company address and click on "Set Work Location". A big orange dot is then displayed on the map to indicate your company's location.
Now you can visualize the distribution of the members on the map and their various modes of transportation! Hope this tool is useful for you. If you have any question or suggestion, please send them to us at ride@duetinc.com.
Note: there is a limit of how many members that you can map, typically around 5000. If you want to map a larger data set, please contact us for the next tier option.
An example of mapping